
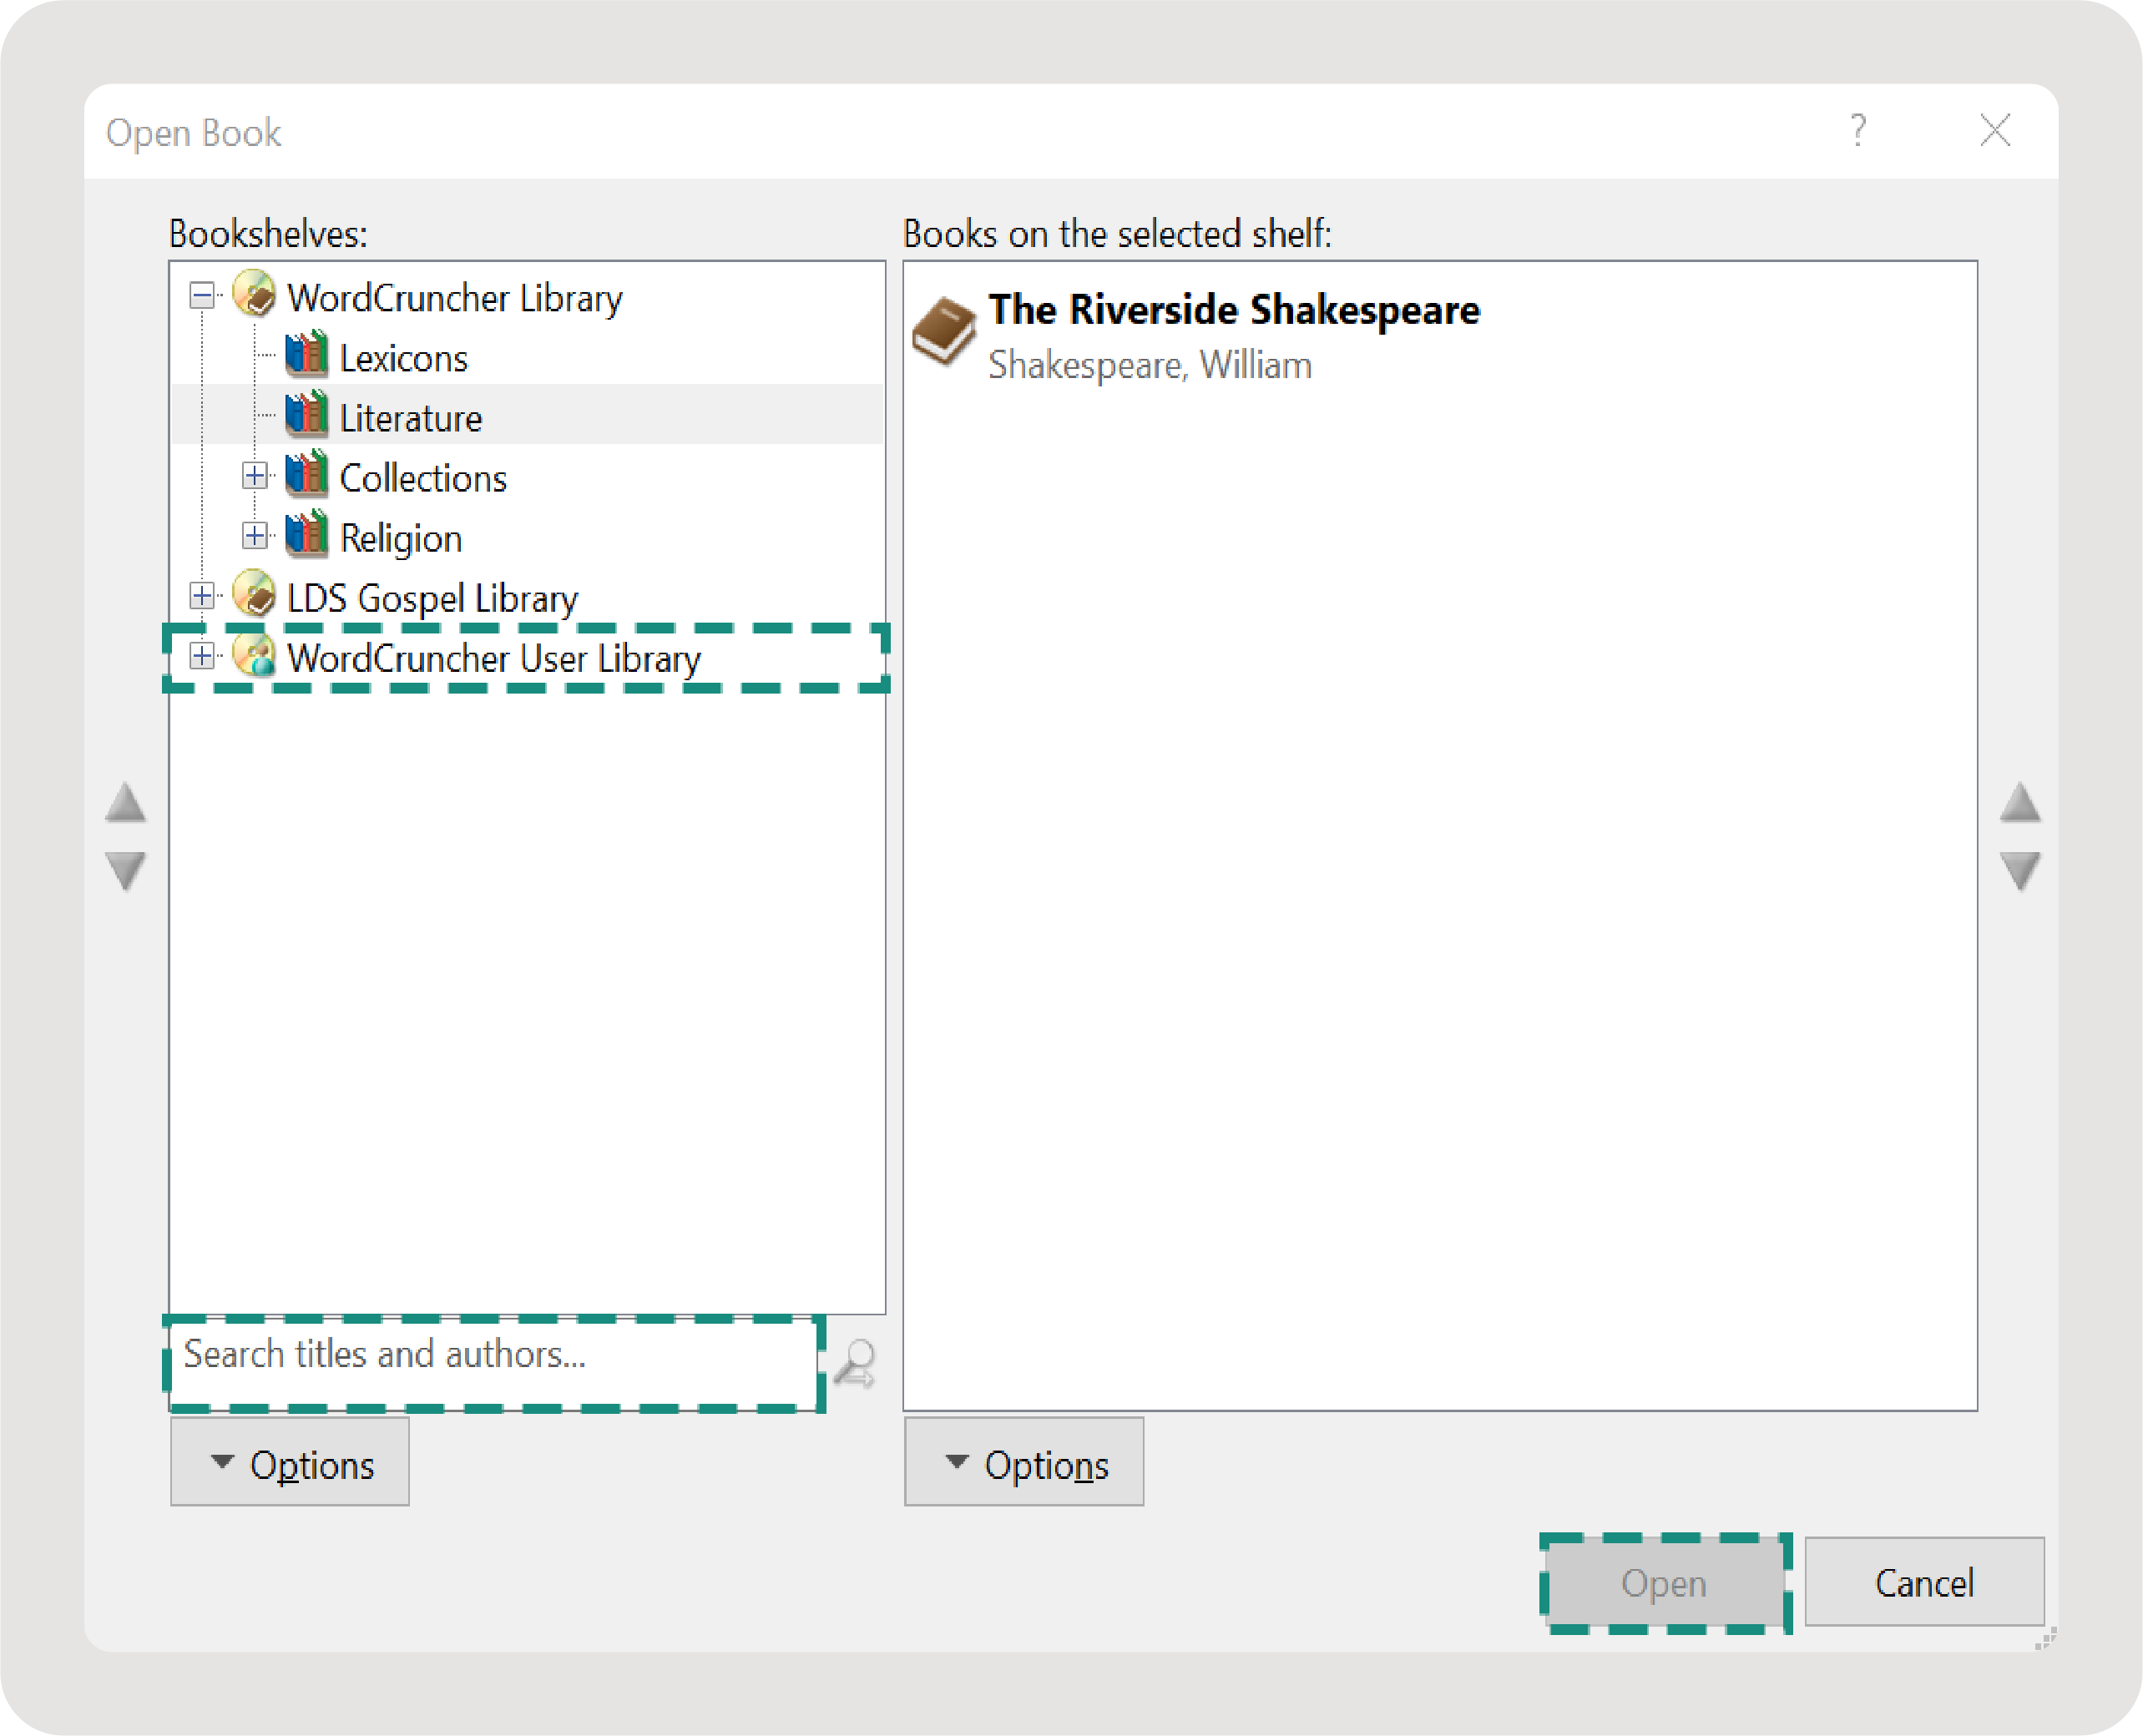
When you open WordCruncher, your first task is to open a book. This page will provide information on how to open a book, download a book from the bookstore, import your own book, and manage your books.
Open a Book You've Downloaded
Access all books that have been downloaded to your computer
in the Open Book menu. When you first install WordCruncher,
The Riverside Shakespeare is automatically downloaded.
How to open a book:
- In the WordCruncher toolbar, click
File > Open Book.... - Browse the bookshelves or search for a book.
- Select a book and click
Open.
Download a Book from the Bookstore
The WordCruncher Bookstore offers books that are available for download, many of which are free. View the most popular texts in our bookstore. When you download a book from the bookstore, it will download to your device. If you switch devices, you will have to install the book on the new device.
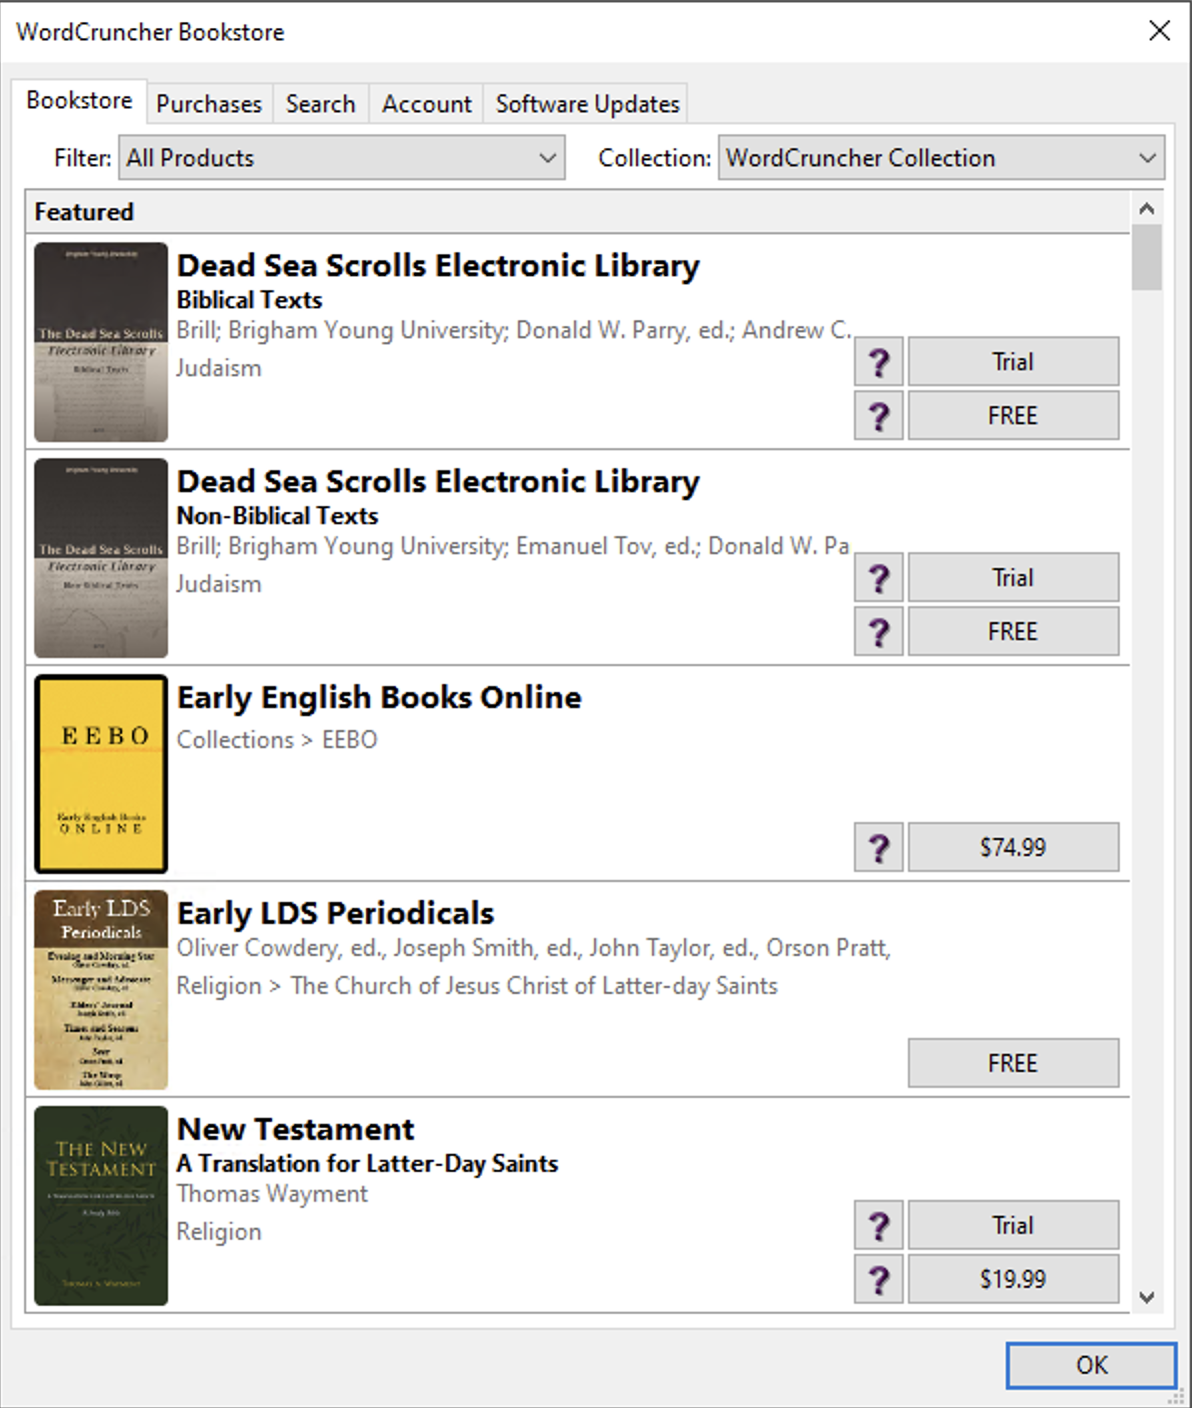
How to download a book:
- In the WordCruncher toolbar, click
File > WordCruncher Bookstore. - Choose a collection (WordCruncher Collection or Gospel Library).
- Browse or search for a book.
- Download the book.
-
If the book is free:
- Click
FREE. - Click
Install.
- Click
-
If the book is paid:
- Log into your account.
The purchase will be linked to your account and available for download on any device you sign into. - Click the price.
- Follow the prompts in the payment window.
- Log into your account.
-
If the book is free:
- Click
Open.
Create an Account
A WordCruncher account will allow you to purchase books.
How to create an account:
- In the WordCruncher toolbar, click
File > WordCruncher Bookstore. - Select the
Accounttab. - Click
Create.... - Enter your information and click
OK. - You will receive an email from noreply@wordcruncher.com with a temporary password.
- In the
Accounttab, clickLogin.... - Enter your username and the temporary password.
- Click
Change Password...and follow the prompts.
Import a Book
You can import a book of your own with the WordCruncher Indexer program. The Indexer will convert your files into the WordCruncher ETBU format.
1. Download the WordCruncher Indexer
The WordCruncher Indexer is separate desktop app that will convert your files.
Note: To convert image files for WordCruncher, use the WordCruncher Image Library Manager.
2. Use the Indexer: Convert Files to ETBU
An index keeps track of your files so that they are easier to find later. WordCruncher uses an indexed file format called an ETBU file, allowing you to find words and phrases faster.
When you use the WordCruncher Indexer to convert a file, it will create two files: an ETBU file (the format we will open in WordCruncher) and an ETAX file (an editable XML-like file). For more information on the ETAX format, go to the ETAX documentation page.
Convert TXT files
- Open the WordCruncher Indexer and click
Index. -
Select TXT file(s).
If you select multiple files, you will see a message that says, “Would you like to append the output to the same file?” Choosingyeswill combine all TXT files into one WordCruncher book called AppendedOutput.etbu. -
Languages System Defined Language
- Set the language.
- User Defined Language: Set the encoding.
If you’re unsure or don’t know about character encodings, chooseUTF-8. At the bottom of this window, you will see a sample of your text. Make sure the preview looks correct before moving on.
- Click
Finish.
Convert Word documents (DOCX)
To index a Word document, first convert it to the Word 2003 XML file format.
- Save your Word document as a Word 2003 XML Document. Go to
File > Save Asand select Word 2003 XML Document (.xml). - Open the WordCruncher Indexer and click
Index. - Select the XML file and click
Open.
Create a table of contents with Word heading styles
By default, your WordCruncher book will not include a table of contents (levels). To separate the text into levels, use Microsoft Word heading styles.
- Open your document in Microsoft Word.
- Add
Heading 1styles for the top level,Heading 2for the next level, and so forth. - Save your Word document as a Word 2003 XML document.
- Open the WordCruncher Indexer and click
Index. - Select the XML file and click
Open.
Convert Excel sheets (CSV)
If your text has metadata, a CSV file will allow you to include it. Including metadata will allow you to get more out of WordCruncher searches and analysis reports. For each line in the CSV, provide the paragraph of text, information about the level (table of contents), and attributes (metadata).
- Format the CSV file as instructed below.
- Convert the CSV to ETAX with the CSV to ETAX converter web tool.
- Open the WordCruncher Indexer and click
Index. - Select the ETAX file generated by the web tool and click
Open.
Format the CSV file
Organize your columns into three sections: Levels, Text, and Attributes. The Text column is required, while the Levels and Attributes columns are optional.

Levels
Add Level columns (max 10). Name each column Level: [Name].
Each level represents a section of the table of contents.
Text
To the right of the Level columns, add a column named Text. In each row, include a paragraph of text.
Attributes
To the right of the Text column, add Attribute columns (max 14).
Name each column Attribute: [Name].
Additional Notes
- Avoid leaving cells blank. Empty cells in the Text and Level columns may cause errors.
- Order levels properly. In a book, you wouldn’t place Chapter 2 before Chapter 1.
Convert PDFs
If you have PDFs, you will first need to convert them to text (like a Microsoft Word document or TXT file). There are programs like Adobe Acrobat or PDF2GO that can do this. Some PDFs might be images that need optical character recognition to recognize the text.
Once your text has been converted to a Microsoft Word document or TXT file, refer to the previous sections for instructions on using the Indexer.
Convert Old WordCruncher files (BYB, ETA, ETB)
Older versions of WordCruncher files (such as BYB, ETA, and ETB files) can be indexed to generate the newer file formats, ETAX and ETBU.
- Open the WordCruncher Indexer and click Index.
- Select the BYB, ETA, or ETB file and click Open.
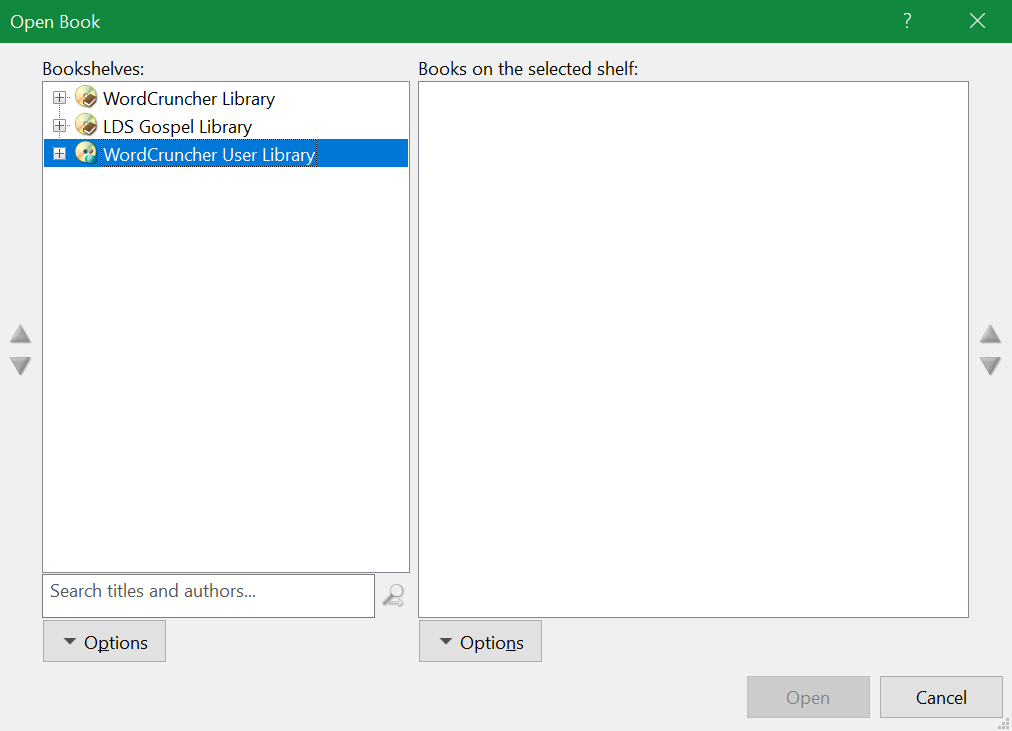
3. Add ETBU File(s) to the WordCruncher User Library
Add the book file to your personal user library and open it.
- Open WordCruncher.
- In the WordCruncher toolbar, go to
File > Open Book.... - Click the
WordCruncher User Library. - Click
Options > Add Book.... - Select the ETBU file.
- Click
Open.
Customize Books
BookSets
A BookSet displays multiple books in the same window. Most commonly, a BookSet is made up of text and footnotes. There are a few pre-made BookSets in WordCruncher, like The Scriptures, but you can also create your own.
BookSets are useful for showing synchronized books in the same window. For example, as you scroll through the text of The Scriptures, the footnotes will reposition. For more information about creating synchronized books, visit the ETAX documentation.
How to create a BookSet:
- In the WordCruncher toolbar, click
File > Open Book.... - Select a book that you have added to the WordCruncher User Library.
- Click
Options > Add a BookSet. - Name the BookSet.
- For each book in the BookSet, select the book and click the right arrow.
-
Set the master book. This book will be the primary text (using its table of contents), while the other books in
the BookSet will be secondary.
- Select a book.
- Click
Set Master Book. - Click
OK.
BookSet Options
Customize individual books in the BookSet, adjust the BookSet layout, and create custom word lists.
- In the WordCruncher toolbar, click
File > Open Book.... - Select a BookSet that you have added to the WordCruncher User Library.
- Click
Options > Properties > Options....
BookSet Options Tab
Access the options for individual books in the BookSet, choose whether to show footnotes, and set the default table of contents (if there are multiple).
Synchronous Layout Tab
Customize the BookSet layout, including whether one of the books in the BookSet should be labeled as a footnotes pane.
- Books in the BookSet: A list of books in the BookSet. Next to each book, there is a number (e.g., [1]). These numbers match the
numbers in the
Pane numbers and sizesvisual. - Pane Numbers: To change pane numbers, click the name of a book and click the up or down arrows to reorder the books.
- Footnotes Pane: To label a book as footnotes, click the name of a book and select the
Footnotes pane. - Pane Numbers and Sizes: A diagram of the book layout. Click and drag the borders of the panes to change the size of each pane.
Custom Word Lists Tab
Combine word lists within your BookSet, allowing you to search within one or several books in your BookSet.
- Click
Add.... - Type the name of your word list.
- Click the sections you want in your word list.
- Click
OK. - Click
OK.